
How to Create Realistic Textures in Procreate®: A Step-by-Step Guide
Texturing is a crucial step in bringing your Procreate artwork to life. With the right texture, you can make your digital art look as real as a physical painting or sketch. Ready to add depth, dimension, and real-world charm to your creations? Let’s get started!
Understanding Textures in Art
In the world of art, textures refer to the perceived surface quality or feel of an object. Whether it’s the roughness of a tree bark or the smoothness of a glass surface, textures add depth and realism to your work. In Procreate, we can mimic these textures using brushes and effects.
Creating Textures Using Brushes
Procreate comes with a wide array of brushes that you can use to create different textures. From gritty pencils to smooth airbrushes, you have a whole toolkit at your fingertips. Remember, the key to creating realistic textures lies in observation and practice, so don’t hesitate to experiment with different brushes.
Creating Textures Using Layer Effects
Layer effects, such as blend modes and opacity adjustments, can also be used to create unique textures. For instance, using a ‘Multiply’ blend mode can give a layer a rich, shadowy texture, while a ‘Screen’ blend mode can create a light, airy texture. Experiment with different layer effects to see what works best for your piece.
Using Texture Brushes for Extra Realism
In addition to the standard brushes, Procreate also offers texture brushes that can help you add extra realism to your work. These brushes are specially designed to mimic real-world textures, like fur, fabric, and wood. With a bit of practice, you can use these brushes to bring a whole new level of detail to your art.
Tips for Creating Realistic Textures in Procreate
Here are a few tips to help you create realistic textures in Procreate:
- Always start by observing the texture you want to recreate. If possible, touch it and notice how light interacts with it.
- Use multiple layers to build up your textures. This way, you can tweak each part without affecting the whole texture.
- Don’t be afraid to go back and adjust your texture as you progress. Art is a process of constant refinement!
Creating realistic textures in Procreate is all about observation, experimentation, and patience. So take your time, play around with different techniques, and watch as your digital art comes to life.
Watch the below video to get inspired by even more drawing exercises to improve your skills and build up those drawing muscles!
Mastering Light and Shadow in Procreate: A Beginner’s Guide
Drawing in Procreate offers numerous possibilities, one of which is the ability to create stunning effects with light and shadow. Light and shadow give your artwork depth, dimension, and a sense of realism. This guide will take you through the basics of using light and shadow in Procreate.
Understanding Light
The first step in mastering light and shadow is understanding light itself. Light in your artwork is what illuminates your subjects and sets the overall tone. The quality of the light (soft or harsh, warm or cool) can dramatically impact the mood of your piece.
For instance, a strong, direct light source can create bold, intense shadows and a dramatic effect, while a softer, diffused light source can create gentler shadows and a more serene effect.
Understanding Shadow
Just as light illuminates, shadows define. Shadows in your artwork provide the contrast needed to highlight form and depth. There are two types of shadows you’ll work with: cast shadows and form shadows.
- Cast shadows are the dark areas that occur when an object blocks light.
- Form shadows, on the other hand, are the shadows that exist on the object itself, showing its three-dimensionality.
Understanding these two types of shadows and how they work together is key to creating realistic depth and volume in your Procreate art.

Using Procreate’s Tools for Light and Shadow
Procreate provides a range of tools that can help you effectively apply light and shadow to your artwork. Here are some to get you started:
- Brushes: Procreate has a variety of brushes that can be used to create light and shadow effects. For instance, the ‘Soft Brush’ under ‘Airbrushing’ is excellent for soft shadows and diffused light.
- Blending Modes: Layer blending modes can be used to create interesting light and shadow effects. For example, the ‘Multiply’ blending mode is great for creating shadows, while the ‘Add’ and ‘Screen’ modes can be used for highlights and light effects.
- Layers: Layers are incredibly useful when working with light and shadow. You can add your light and shadow on separate layers, allowing you to adjust them independently without affecting the rest of your artwork.
Practical Exercises
To master light and shadow, practice is key. Start with simple shapes, like a sphere or a cube, and experiment with different light sources and shadow positions. Try different brush types and blending modes to see how they affect your result. As you become more comfortable, you can progress to more complex forms and compositions.
Tips and Tricks
Here are a few extra tips for working with light and shadow in Procreate:
- Remember that shadows are rarely pure black. They often pick up colors from their surroundings.
- Not all highlights are pure white. They can vary depending on the color and texture of the object and the color of the light.
- Use layers and layer masks when working with light and shadow. They allow for more flexibility and control.
Conclusion
Mastering light and shadow in Procreate can truly take your artwork to the next level. It may seem daunting at first, but with understanding and practice, you’ll soon be adding depth and dimension to your digital art like a pro. So, grab your iPad, open Procreate, and start experimenting with light and shadow today!
Creative Exercises to Improve Your Digital Art Skills in Procreate
Improving your digital art skills requires consistent practice and creativity. One of the best ways to enhance your abilities is by engaging in creative exercises. These exercises can help you build a strong foundation, break out of creative ruts, and experiment with new techniques and ideas. In this article, we’ll discuss several creative exercises you can try in Procreate to boost your digital art skills.
Exercise 1: Draw with Different Brushes
Procreate offers a vast library of brushes, each with unique properties. Challenge yourself to create an artwork using a brush you’ve never used before or rarely use. It’ll force you to adapt to the brush’s characteristics and may even inspire you to develop a new style.
Exercise 2: Limit Your Color Palette
Choose a color palette with only three or four colors and create an artwork using only these colors. This exercise helps enhance your understanding of color relationships and composition.
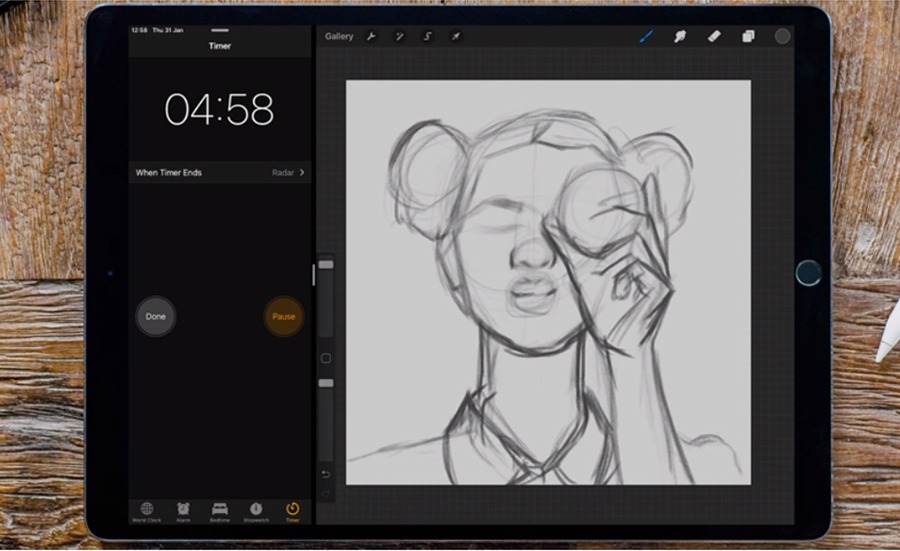
Exercise 3: Gesture Drawing
Gesture drawing is an excellent exercise to improve your understanding of form and movement. Set a timer for a short period (1-2 minutes) and draw quick sketches focusing on capturing the movement and energy of your subject rather than the details.
Exercise 4: Replicate Traditional Art Techniques
Try to replicate traditional art techniques, like watercolor or oil painting, using Procreate’s tools. It’s a great way to explore the app’s capabilities and expand your digital artistry.
Exercise 5: Draw from Memory
Choose a subject and study it for a few minutes, then put it away and draw it from memory. This exercise is a good way to improve your observation and memory skills.
Exercise 6: Participate in Art Challenges
Art challenges, like Inktober or Draw This in Your Style, can help you push your creative boundaries and motivate you to create regularly. Plus, they offer the opportunity to connect with a community of fellow artists.
Conclusion
Creative exercises are a fun and effective way to improve your digital art skills in Procreate. Remember, the goal of these exercises isn’t to create a perfect piece of art—it’s to learn, experiment, and grow as an artist. So, grab your iPad, open up Procreate, and let your creativity flow!
In the video below you will find even more creative drawing exercises to unleash your art!
Using Procreate for Relaxation and Mindfulness
Digital art has become an increasingly popular medium for artists, and with the rise of mobile devices like the iPad, it’s never been more accessible. But beyond its practical applications, digital art can also be a powerful tool for relaxation and mindfulness. Procreate, offers a wealth of features that can be utilized to promote a mindful state.
What is mindfulness?
Mindfulness is a mental state achieved by focusing one’s awareness on the present moment, calmly acknowledging and accepting one’s feelings, thoughts, and bodily sensations. It’s widely used as a therapeutic technique and is known for its stress-relieving properties.
Procreate as a mindfulness tool
Procreate, with its intuitive interface and extensive array of brushes, can be a fantastic mindfulness tool. When you engage in creating art on Procreate, you are in the moment. You’re not thinking about the past or worrying about the future. You’re focused on the stroke of the brush, the blending of the colors, the gradual emergence of shapes and forms.
Benefits of Using Procreate for Mindfulness
- Stress Relief: Creating art can be a form of self-expression that allows you to channel and release your emotions. This can help reduce stress and promote relaxation.
- Improved Focus: As you concentrate on your artwork, you can help train your mind to focus better. This can have positive effects on other areas of your life, such as work or study.
- Boosted Creativity: Regularly practicing mindfulness can lead to increased creativity, and what better way to channel that creativity than through art?
How to practice mindfulness with Procreate
To practice mindfulness while using Procreate, try the following steps:
- Choose a quiet and comfortable space: Make sure you’re in an environment where you can concentrate on your art without any disturbances.
- Focus on the process, not the result: Don’t worry about creating a masterpiece. Instead, pay attention to the process of making the art: the movement of your hand, the feel of the stylus on the screen, the colors and shapes appearing before you.
- Breathe: Ensure you’re maintaining a regular, calm breathing pattern. This helps maintain a relaxed state.
- Take your time: Don’t rush. Art is not a race. The slower and more deliberate your movements, the more you can be in the moment.
In conclusion, Procreate isn’t just for creating stunning digital art. It’s also a fantastic tool for relaxation and mindfulness. So why not pick up your iPad, start up Procreate, and lose yourself in the art of the moment? It’s a therapeutic experience that’s good for the mind and soul.
10 tips to improve your sketching skills
A good sketch is a great base for your artwork, but sketching is also a great way to improve your drawing skills overall. Sketching doesn’t have to take a lot of time and with deliberate exercises, you can improve your skills real fast. These are my 10 sketching tips for beginners.
1. Sketch daily
Sketching daily will greatly improve your drawing skills over time, even if you just spend 10 minutes a day, it’ll help! If you keep a sketch pad, or your iPad, near you, you can start skething whenever you have some spare time. Don’t worry too much about the end result, but just enjoy practicing your sketching skills.
2. Set a time limit
If you set yourself a time limit when sketching, you force yourself to only focus on the most important aspects of the subject your drawing. It’ll train your eyes and your drawing hand this way. You can start off by setting a 10 or 15 minute limit and once you feel more confident, go for a 5 minute, 2 minute or even 1 minute time limit! You will force yourself to focus in simple shapes and not go into too much detail.
3. Simple shapes
Try starting off you sketch with simple shapes. Try to see the basic shapes in the subject your drawing. Do you see circles, rectangles, triangles? Try to simplify your subject with your mind or just draw these simple shapes on top of your reference image!
4. Variety
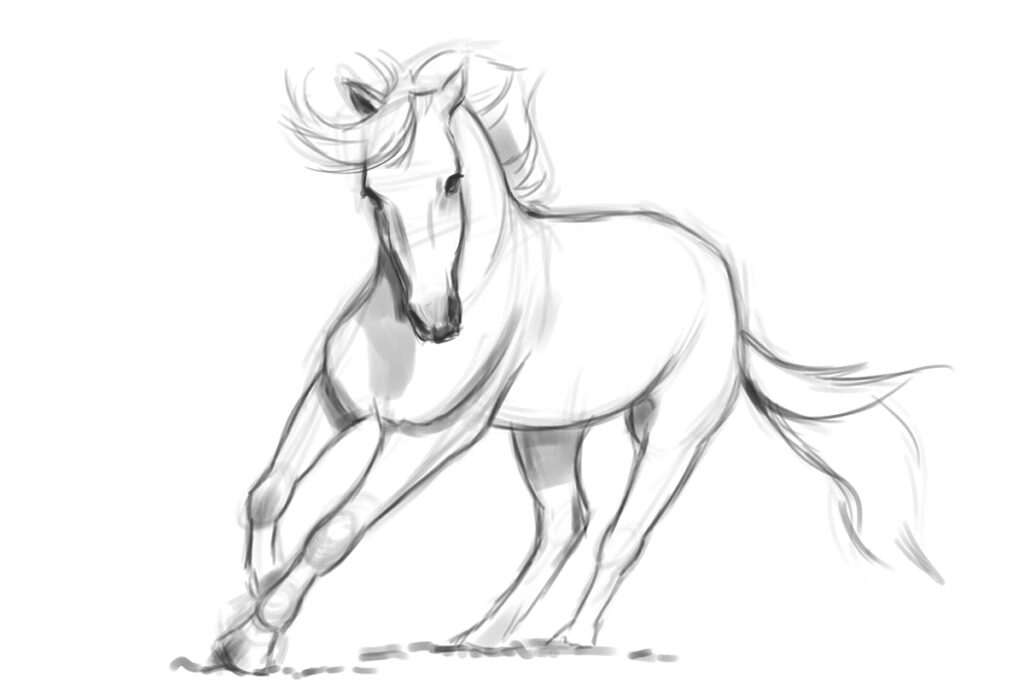
Try to sketch a variety of subjects. Don’t just sketch what you are used to sketch and what you are comfortable with. Try to sketch subjects that you usually wouldn’t draw as well. I sketched a horse for example, something I haven’t done in ages! It’s really refreshing to sketch something you normally wouldn’t.
5. Use multiple layers
Layers can come in very handy when sketching digital. You can build up your sketch through multiple layers. You can start out with a rough sketch on your first layer and then make a more refined layer on a second layer, you can just turn down the opacity of the first sketch layer. If you want to refine your sketch even more after that second layer, you can go for a third of course!
6. Sketch from a sketch
My next tip is to make a sketch from a sketch. This will help you to loosen up your sketches. You can use you first sketch to make a new sketch, without looking at the reference. Sketching like this will free your mind, you can exaggerate some parts of your sketch for instance.
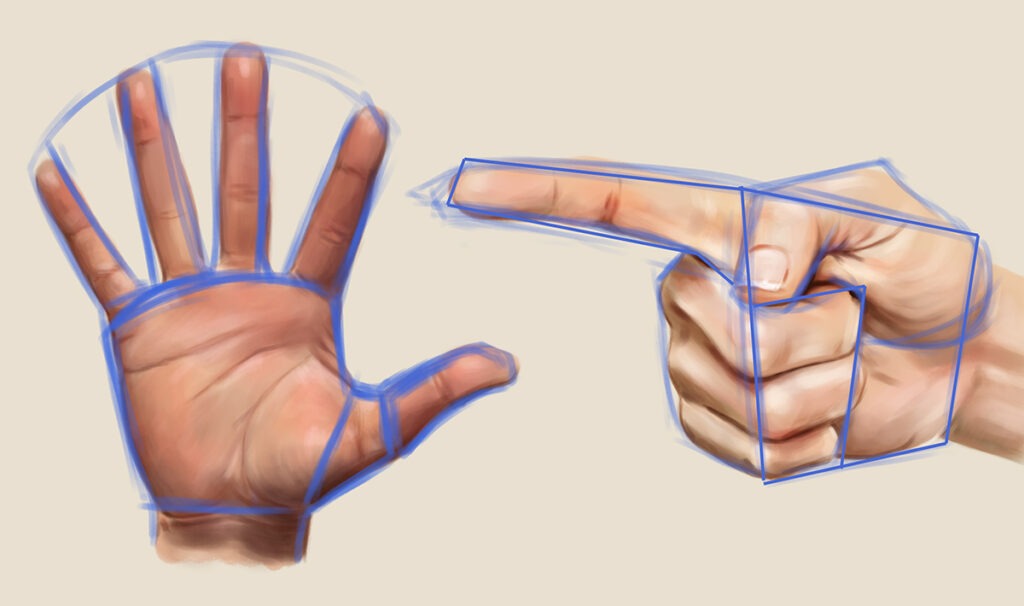
7. Extending lines
A way to make proper measurements in your sketches is to extend lines. Check your reference to see where lines would end if you would extend them. You can either do this for real, by drawing over your reference or you can do this with your minds eye.
8. Lines vs Blocks
There are different ways of sketching. You can use lines to sketch, or you can use a big brush to paint big blobs of color or values to make a sketch made up of shapes and values. Try out different ways of sketching to see what works out best for you.
9. Experiment with brushes
Experiment with different types of pencils and brushes. Some brushes can have surprising effects and can help to keep your mind fresh. Procreate has many brushes for instance, try them out and see what works out for you.
10. Draw from life
My final tip is to draw from life. Just grab some random stuff and sketch! It’s a great way to do your daily sketches and to exercise your skills. Sketching from life will train your artists eye. And the great thing is, you can do it anywhere!
How to sketch complicated subjects
There are many possible ways to approach sketching. Building your subject by using base shapes like circles and rectangles or sketching using flowing lines, starting out real messy. OR you can sketch complicated subjects by following these steps. In this article I’ll give you some quick tips on how to sketch complicated subjects.
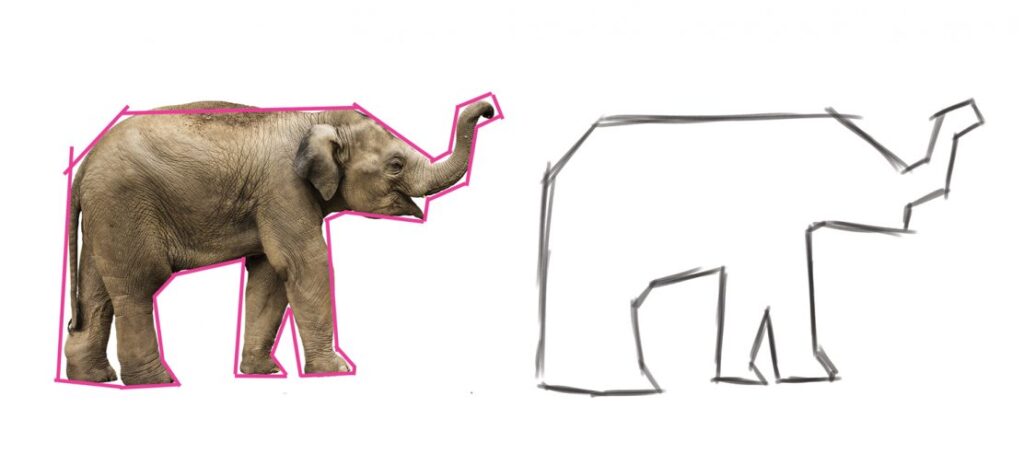
Step 1 – Simple form
First I’ll think of the simple outline of the subject I’m sketching. I usually do this by making imaginary lines around the subject, but you can also make real lines around your reference to make it a bit easier to find that simple form.
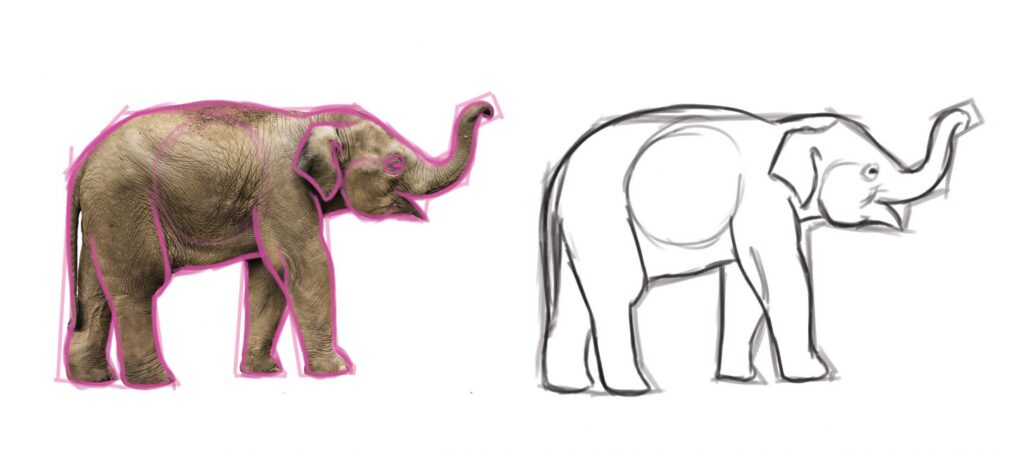
Step 2 – Refine outline and add shapes inside the form
Next I’ll refine the outline of the subject and add the shapes inside the form. In this case that’s the legs, the round shape of the belly, the ear, face, etc. Shapes can still be pretty rough.
Once I have that rough sketch down, I’ll turn down the opacity and use this rough sketch as a base for a more refined sketch.
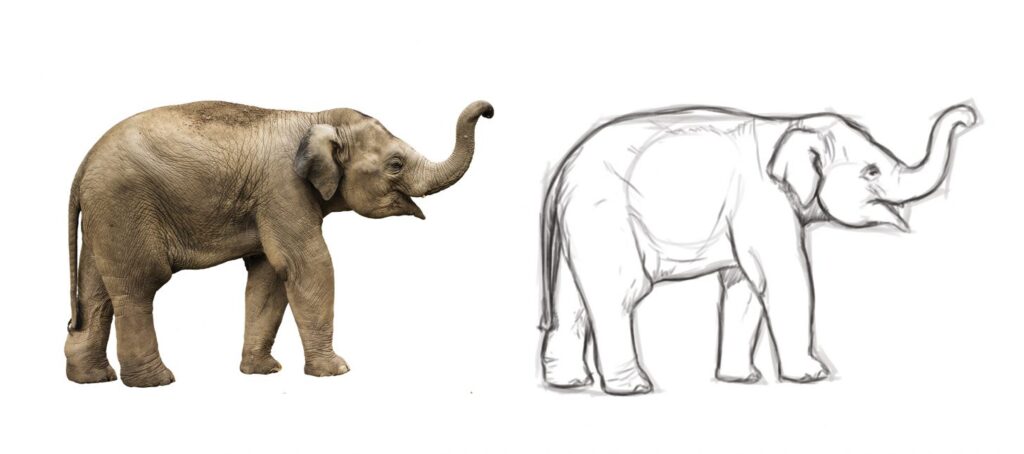
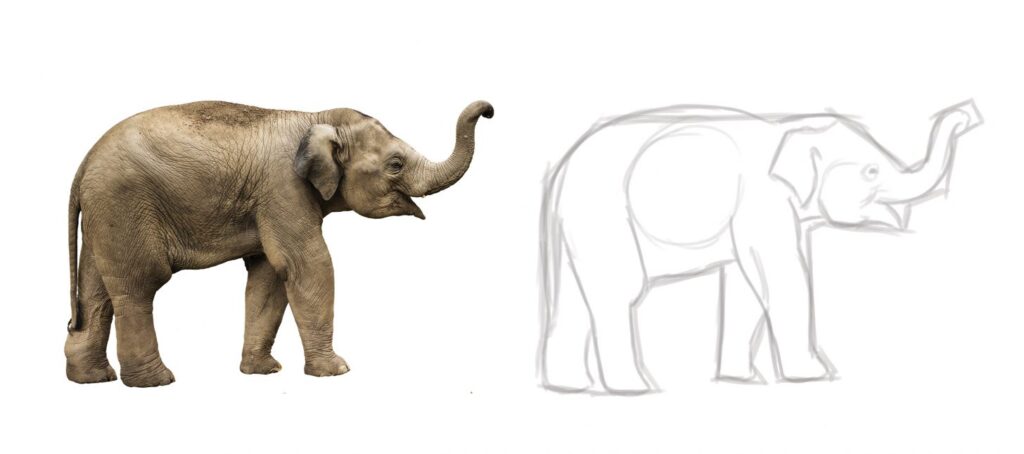
Step 3 – Refined sketch
The last step is to make a refined sketch, in this sketch I add all the detail I need for the painting process. You can also add an extra step by turning down the opacity of this sketch and make another even more refined sketch on top. You can take as many steps as you like of course!
Now you have a better idea of how to sketch complicated subjects. Want to get more sketching tips? Check these 10 tips on how to improve your sketching skills.
Finding reference photos for drawing
When making art it’s always a good idea to study reference material. Finding reference can sometimes be a challenge though. In this article I’d like to give you some pointers on finding reference photos of a good quality. Where can you find these references and what should you be paying attention to?
A good quality reference image can help you figure out anatomy, certain lighting set ups, textures, etc. When you’re having trouble finding reference, because perhaps the subject is too specific, then you can also make your own photos of course, or study from life!
Sources for finding reference
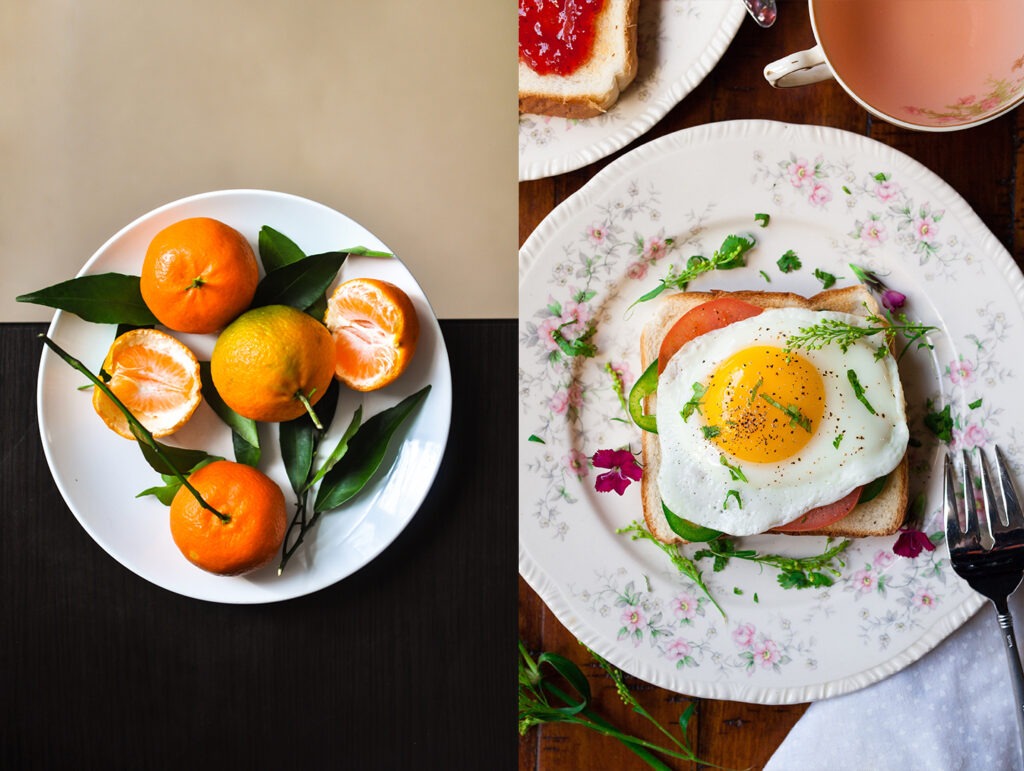
Free stock photo websites like Pexels and Unsplash are great resources for finding reference of a variety of subjects. From food to landscapes, from portraits to abstract textures.

To find inspiration, I like to scroll through the trending or new photos on the websites. Or sometimes I use a search term or a categorie to scroll through specific stuff, like food or portraits. Doing this usually gives me way more inspiration than is good for me 😅
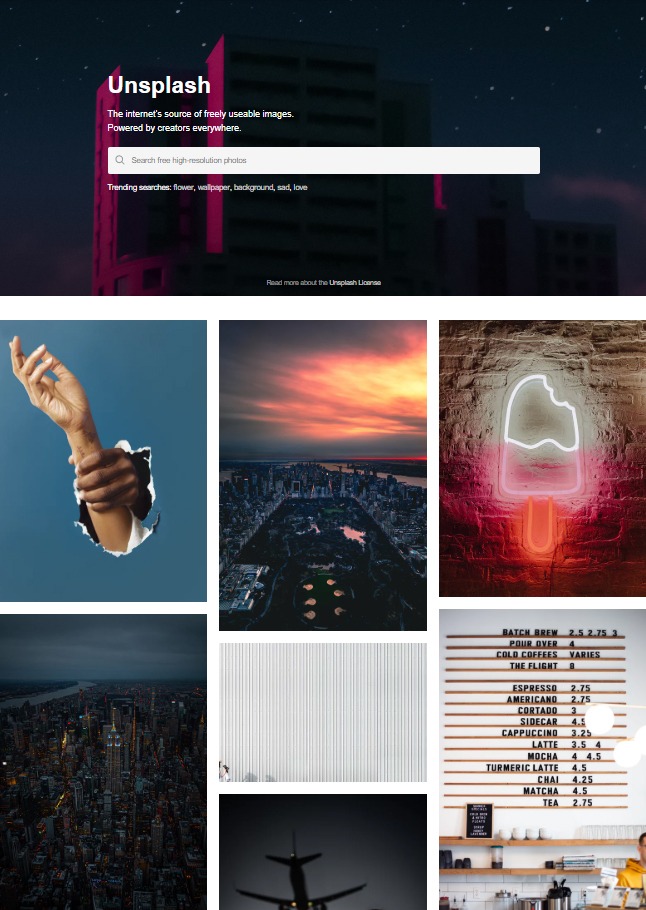
These websites are great to find study material or specific reference photos you might need to bring your artwork to life. If you need a specific type of reference, perhaps a pose or an object you can’t find on these free stock photo pages. Then you can go to paid stock photo websites like Shutterstock or you can make your own reference photos.
You can use a plain background for your objects and make a photo with your phone or photocamera. BUT! Of course you can also use objects to make real life studies. Practicing to paint or draw the everyday stuff around you is a great exercise.
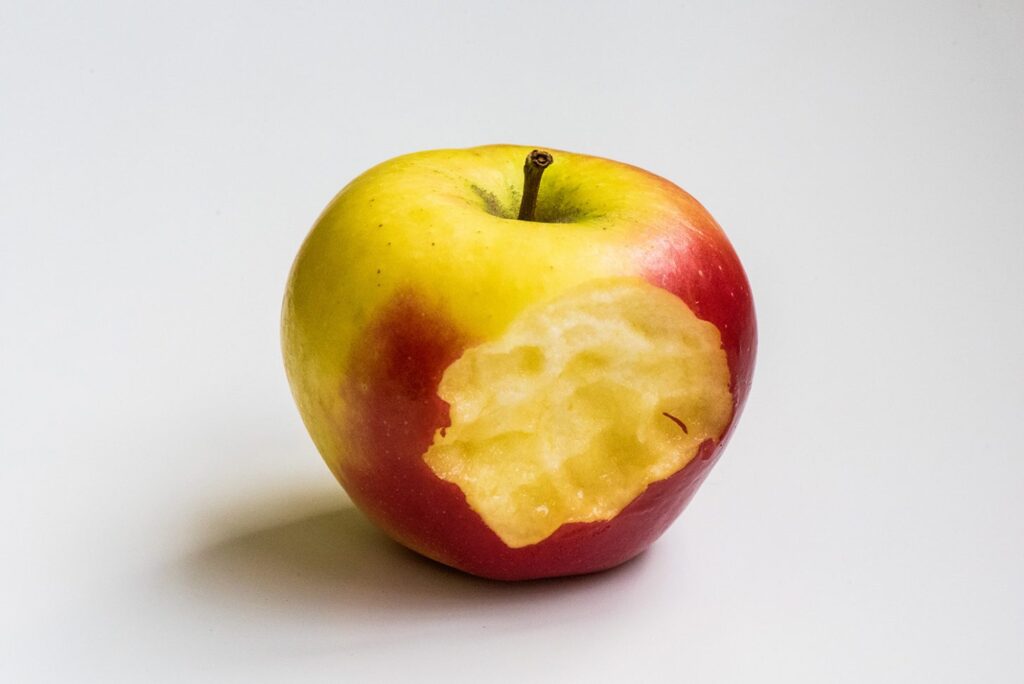
What type of photos to use
So what are good photos to use to study or to use as reference? Sometimes you want to copy a photo, as an exercise to practice painting a certain type of lighting, a pose, specific textures, etc. And sometimes you need a reference photo because you need to paint a specific subject in your artwork, or perhaps you need to figure out how to draw a hand in a specific pose, etc.
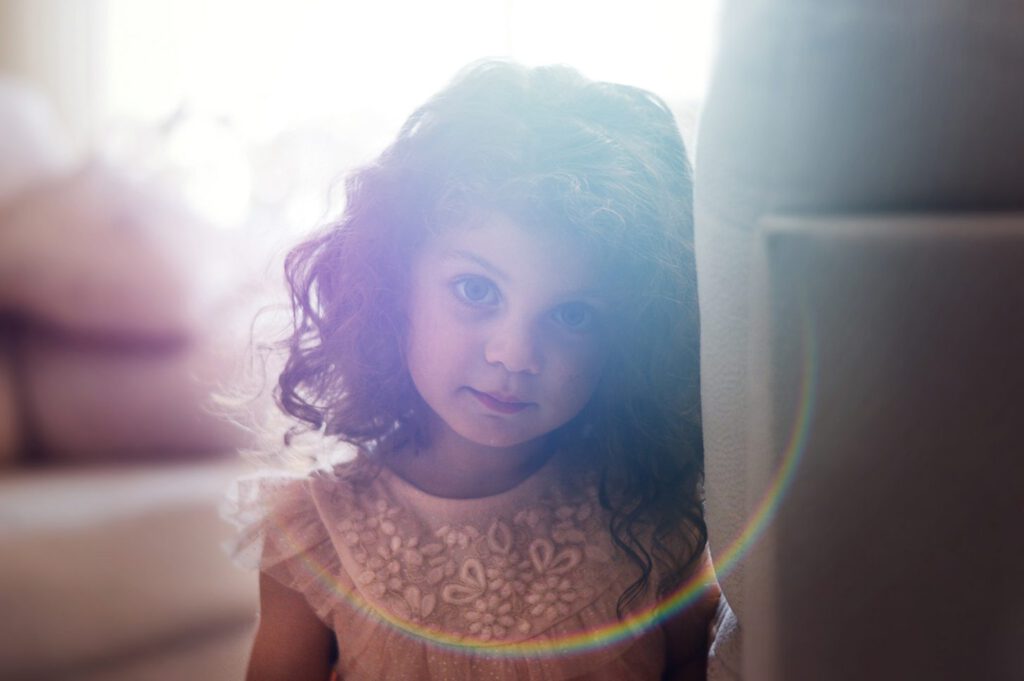
You want to have photos that have a decent resolution and sharpness. Blurry photos are often not very useful. Also, try to pick photos with a pleasant lighting.

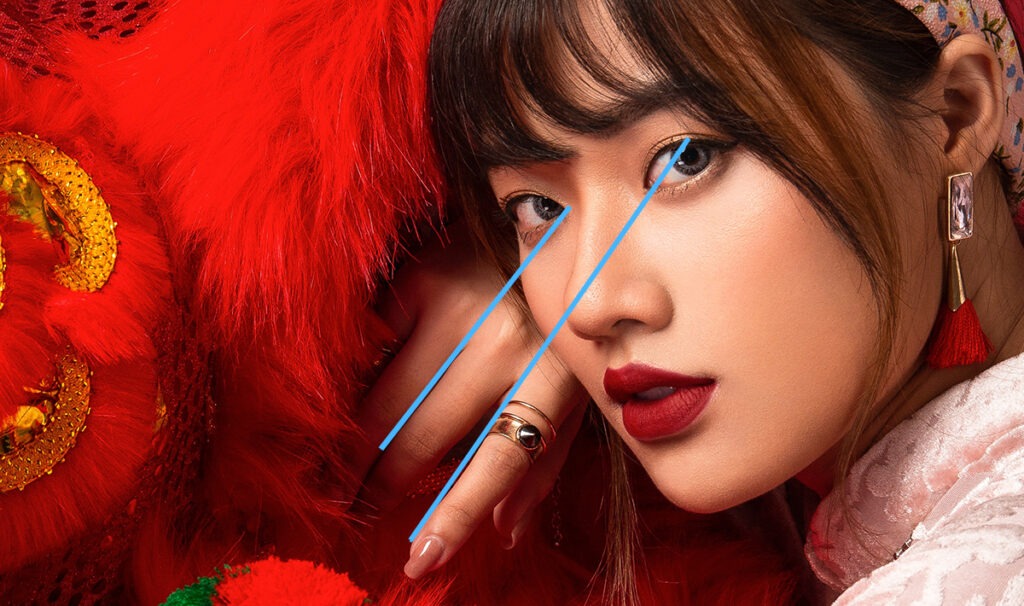
These photos for example have a decent amount of detail and sharpness and a clear lighting. The light is coming from the upperleft, casting some shadows on the right side. At Patreon I have shared a video of how you can make a portrait study of the portrait photo on the right, join the community to watch this and more fully narrated videos.
Here’s an example of a challenging photo, the lighting of this photo has made the photo blurry. I wouldn’t recommend using a photo like this when you are a beginner.
And here’s an example of some nicely lit, sharp food photos. It’s much better than this photo below, in which you don’t see a lot of detail and the lighting is meh.
My tip
I’d recommend making a folder on your computer in which you collect all your reference photos. Sometimes, when you feel stuck or have an artblock, you can go on and browse these stock photo websites and collect all the stuff you like. If you collect everything in a folder, you can always go back to it later.
From traditional sketch to layer in Procreate
In this tutorial I’d like to show you how you can turn a pencil sketch into a layer with transparency in Procreate. Have you made a sketch in your sketchbook and want to turn it into digital art? Then this is a handy way to do it.
Okay, let’s turn a pencil sketch into a layer with transparancy! I’ve just made a simple and cute sketch to demonstrate the process.
Prepare the pencil sketch
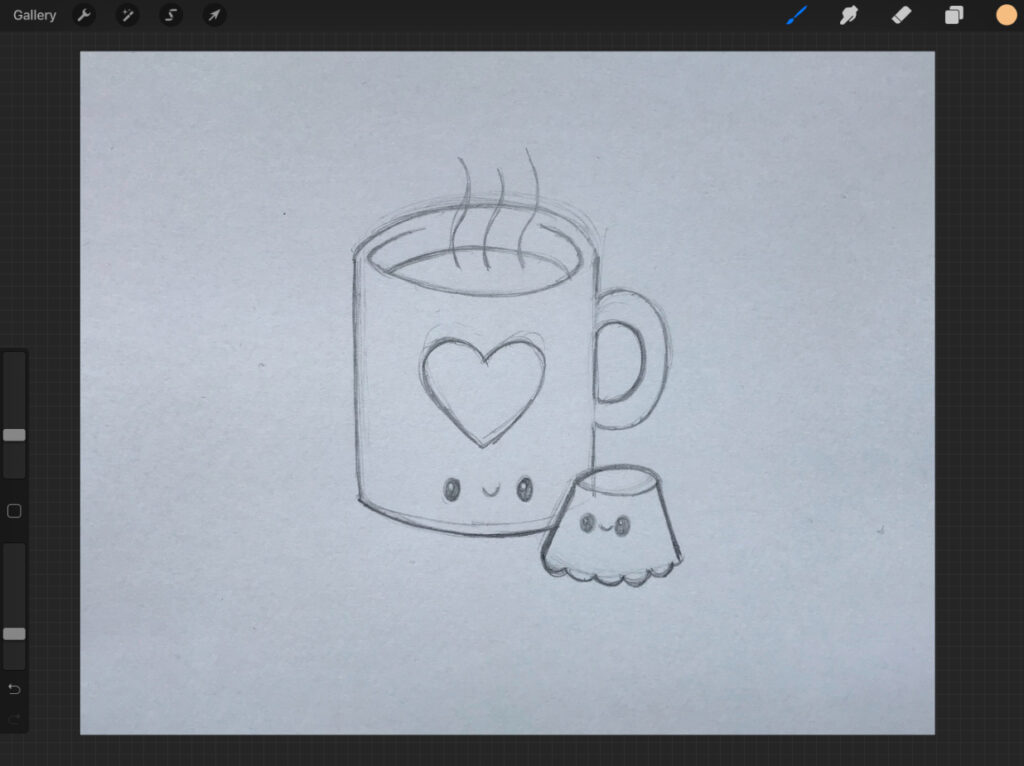
I used my iPad Pro to make a photo of the sketch and imported it into Procreate. Next step is to increase the contrast of the sketch.
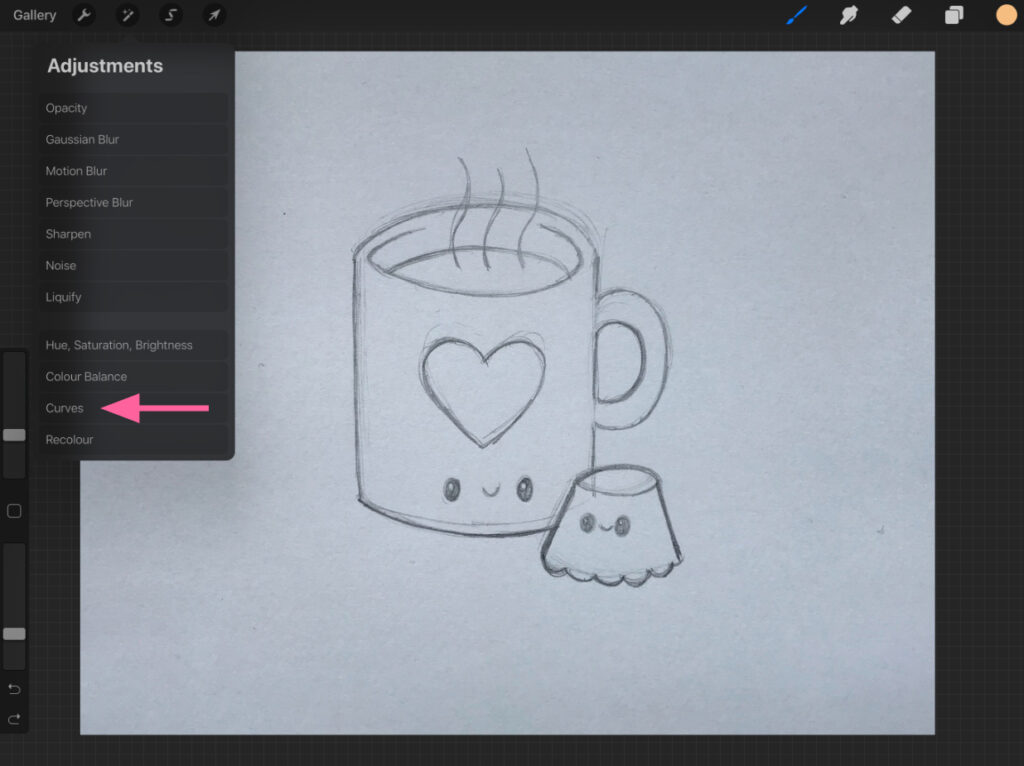
Go to Adjustments in the menu (the magic wand) and then to Curves.
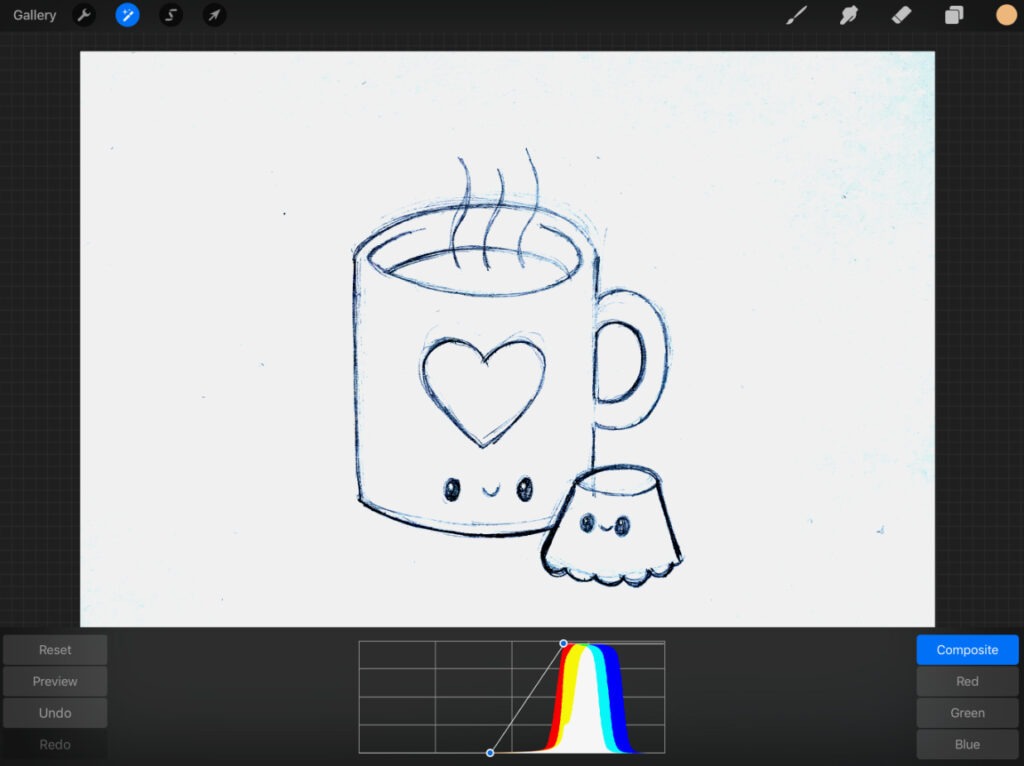
Adjust the curves til you have something like this. Now the paper is fully white and the sketch is near black.
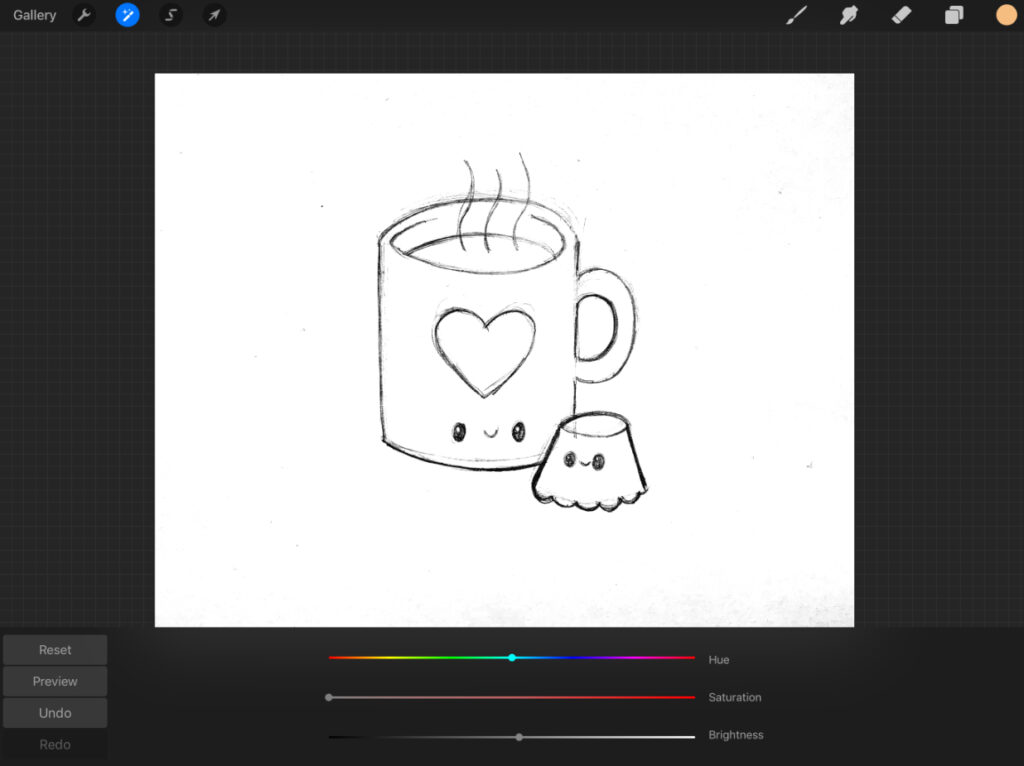
My picture had some blue haze, so I went back to the Adjustments menu again and then selected Hue, Saturation, Brightness. Turn the image to black and white by sliding the Saturation all the way to the left.
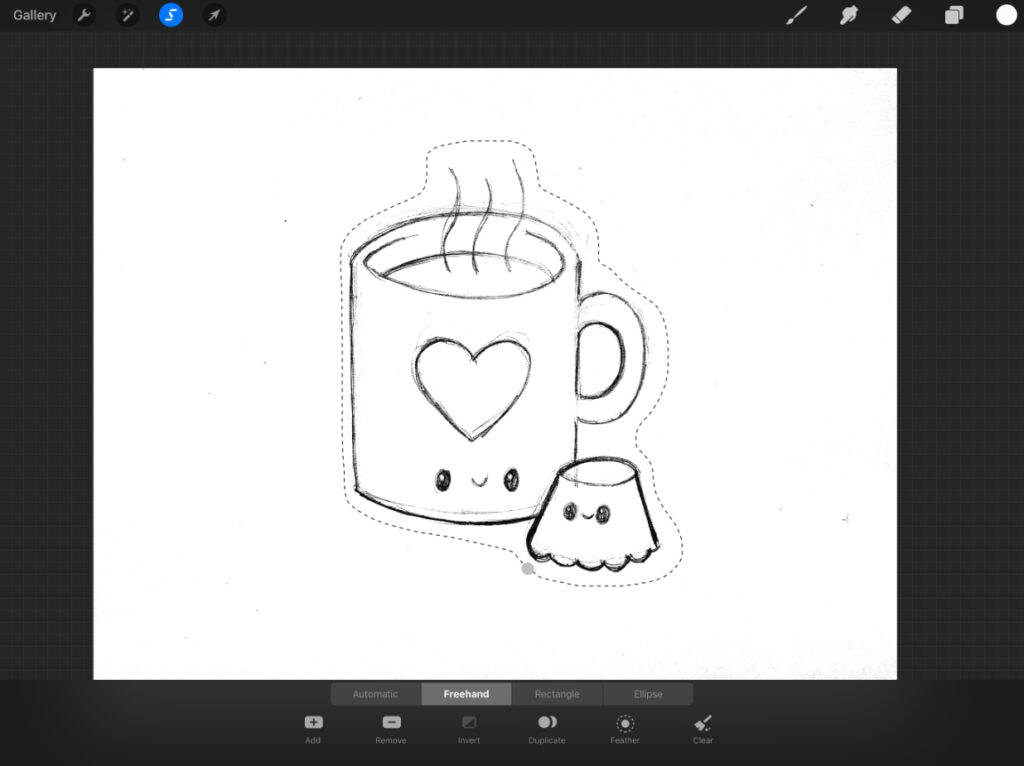
This step isn’t necessary, but I wanted to make the sketch nice and tidy and get rid of the specks surrounding it. I used the Freehand selection tool to select the sketch.

And then I clicked Invert. Now everything surrounding the sketch is selected and I you fill that with the white of the background.
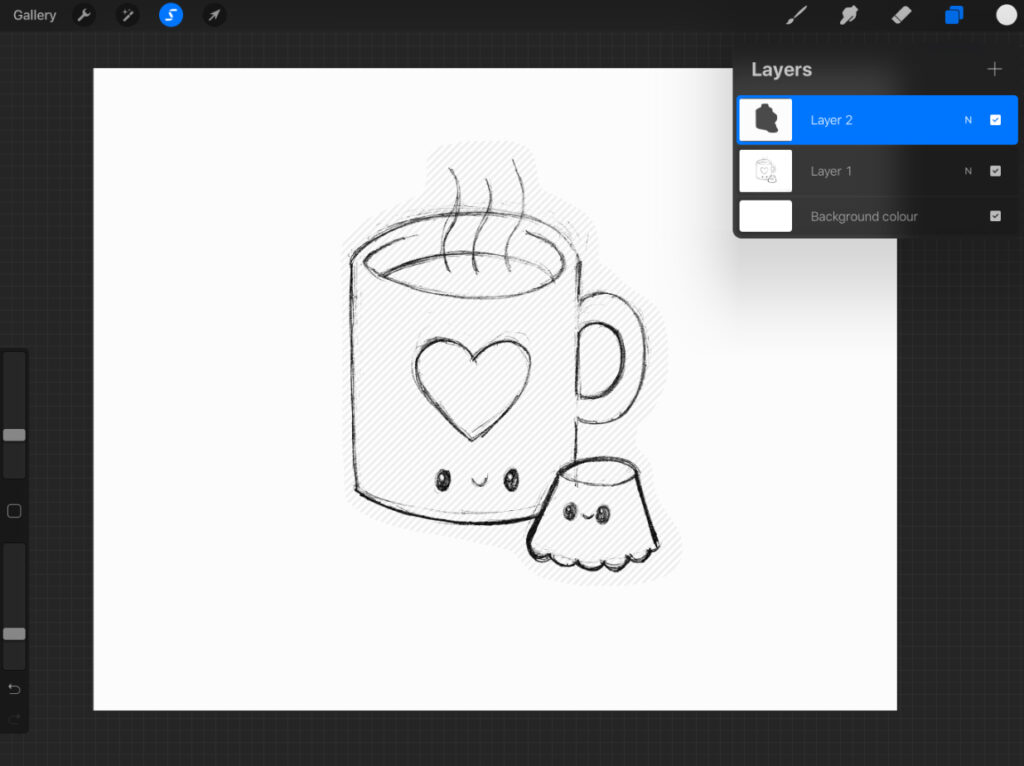
Do that on a new layer above the sketch. Once you have filled it with white, you can merge the two layers.
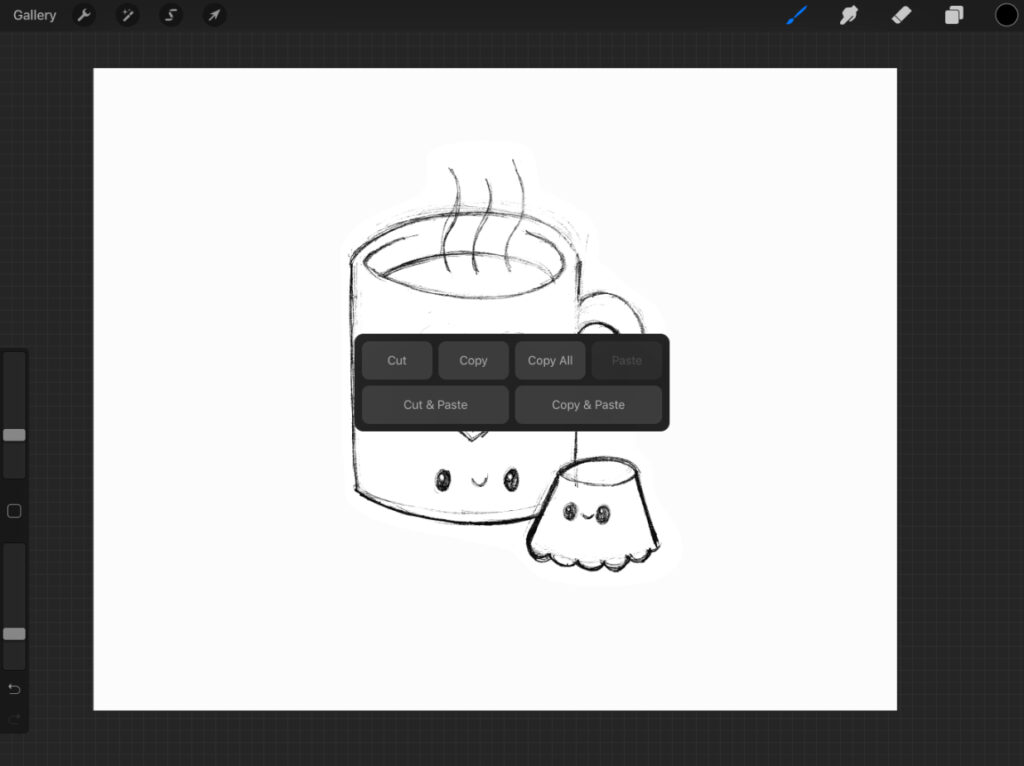
The big trick to turn your sketch into a layer with transparency
And now it’s time for the big trick 😊 Select the layer with the sketch on it and swipe down with three fingers, then select Copy. Make a new layer above the sketch layer and fill this with black (or any color you want your sketch to be). Select the layer and add a layer mask.
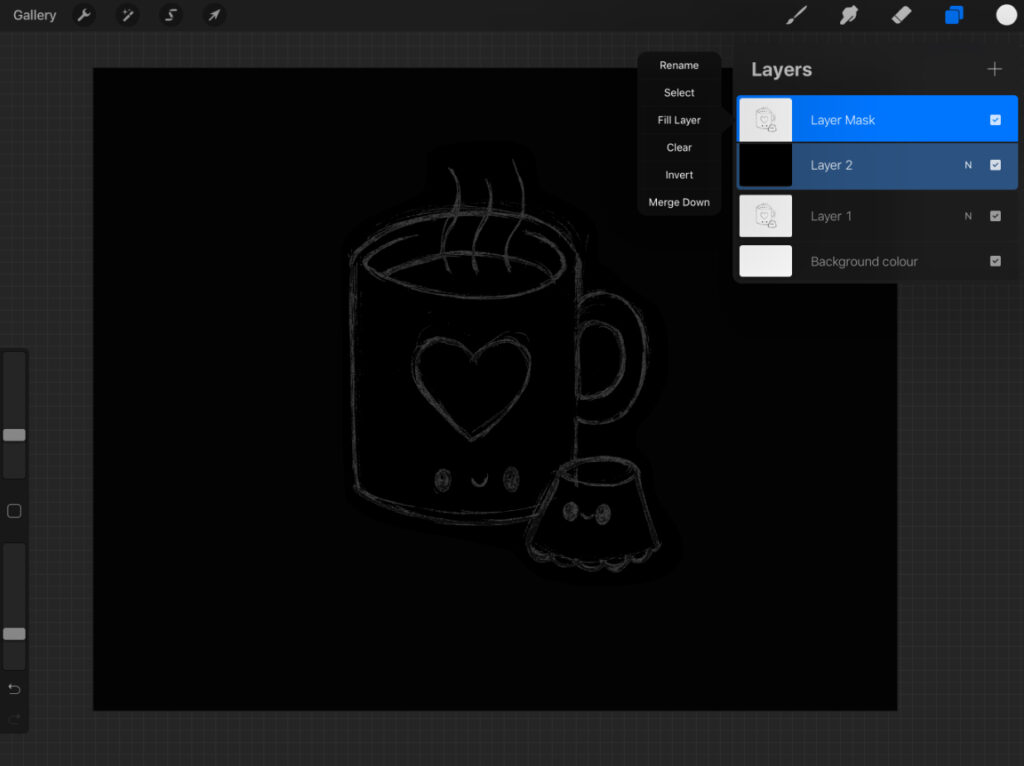
Next, select the layer mask and use the three finger swipe down again. This time, select paste. You’ll see something like the above image now. All you need to do now is select the layer mask again and select invert.
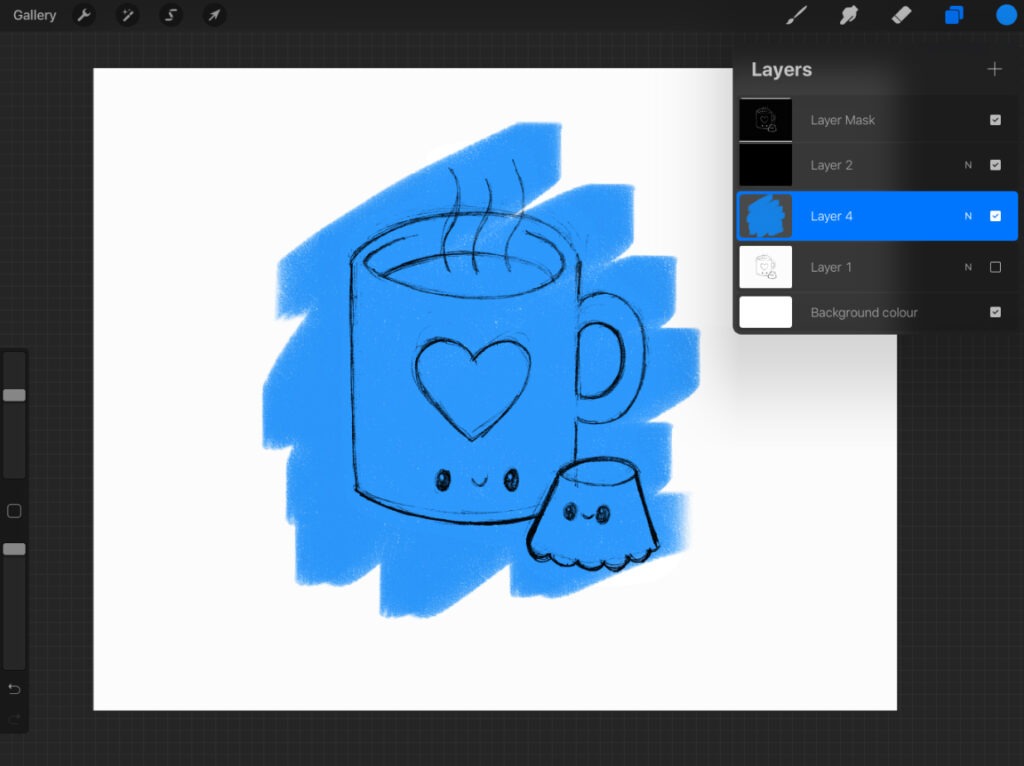
Tadaaaa! Now you know how you can turn your pencil sketch into a layer with transparency. You can paint on layers below the sketch!